Leveraging Windows Vista's Windows System Assessment Tool (WinSAT) API in Visual Basic
Introduction
There are a lot of new features in Windows Vista. In this installment, we’ll explore the WinSAT (Windows System Assessment Tool) API. (The Windows Experience Index in the Vista UI is part of WinSAT.) The Vista SDK defines it as:
Windows System Assessment Tool (WinSAT) assesses the performance characteristics and capabilities of a computer. Developers can use this API to develop software that can access the performance and capability information of the computer to determine the optimal application settings based on that computer’s performance capabilities.
The capabilities also indicate what scenarios and applications will perform well on the computer. For example, if a software package contains a rating on its packaging, a user can use the rating on the software package and the computer’s capability rating to determine if the package will run well on the computer.
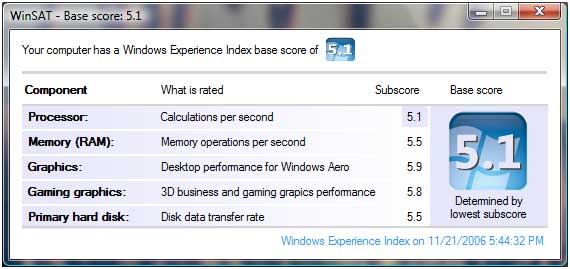
Here is a sample screen shot of this functionality exposed to the end user.
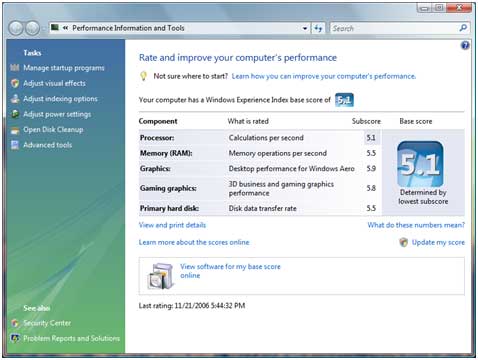
The numeric scores represent an overall performance characteristic for each system “component” in the machine. It’s import to understand that this value is artificially capped at 5.9 and does not necessarily mean raw performance, at least not totally; meaning that there are many factors that are considered for each component when determining the final number including “performance” characteristics. Breakdowns of what the numbers actually mean are as follows:
| Base Score | Applications & Scenarios | Desktop & Laptop Types |
| 1.0 | Basic performance. | Minimal specifications needed to run Windows Vista. |
| 2.0 | Improved responsiveness. | PCs will run Windows Vista but in most cases will not be Aero capable. |
| 3.0 | Aero graphics, Media Center with standard definition TV, basic graphical games, basic performance while running high-end graphical games. | Minimum specification needed to run Windows Vista Premium features, including the new Aero user interface. |
| 4.0 | Snappy performance, high definition video, high resolution monitors, dual monitors. | Very good performing PCs. |
| 5.0 | Fast moving games with amazingly rich graphics, 3D modeling, high end multimedia and high performance applications. | Top end of the PC market. |
Microsoft plans on increasing this number over time (every 12-18 months) to include hardware performance and characteristics as new hardware is released.
Why is this important? Well, it enables several scenarios for the consumer, business management and to us, the developer such as:
- When purchasing a new machine, you could use these numbers to determine if the extra $500 is worth it by comparing a “high-end” machine with another more “generic” machine.
- As an end user, you could use these numbers to determine the bottlenecks in your existing machine and possible ways to improve performance through simple upgrades.
- Packaged software could use these numbers (in addition to their other “minimum requirements”) to give you an idea of whether or not your machine was capable of running said software.
- As a developer, you could dynamically adjust the characteristics of the software based on these numbers. If, for example, they had a low gaming graphics score, you could restrict 3D functionality and instead display a 2D counterpart.
- As a support person, you could use these numbers to diagnose why someone is experiencing poor performance.
As a developer (and to some degree a consumer), it’s important to understand what these numbers mean. There is an excellent entry by Nick White on the Windows Vista Team Blog titled “Windows Experience Index: An In-Depth Look”. (The following is an overview of how the numbers are calculated. To read about how each component is calculated in depth, be sure go there and read the full entry.)
The following are detailed descriptions of each of the base score levels:
1.0
A base score of 1.0 is intended to reflect the minimum specification needed to run Windows Vista™. PCs that meet this level will run Windows Vista™ in a basic, but acceptable manner. This is a “catch all” level assigned to any machine that can realistically upgrade to Windows Vista™ but won’t meet Level 2 specifications.
2.0
A base score of 2.0 represents the mainstream Windows Vista upgrade target system. This level of PC may run Windows Aero but users may see noticeable performance issues from time to time, especially on PCs with scores less than 2.5 and/or 64MB of graphics memory. Performance issues may also be noticeable when opening many application windows at the same time or when using very large monitors.
3.0
This level represents the value end of machines that will ship at the end of 2006 and into 2007. This is the lowest capability Windows Premium Logo PC that will ship with Windows Vista™ pre-installed. Windows Vista will generally enable Aero automatically on level 3 machines. Aero will perform quite well on level 3 machines with single monitors. With dual monitors (especially larger than 1280x1024), users may see noticeable performance issues from time to time, especially on machines with scores less than 3.5 and/or 128MB of graphics memory.
4.0
This level of machine represents a very good performing machine. In late 2006 and 2007 machines at this level will be considered high end. All Windows Vista features will run well with snappy performance. HD playback and recording of one HD stream will work well. 3D games and other high-end 3D applications will run acceptably on Level 4 machines. Multi-tasking will be quite good on these machines (when an application makes use of this capability). Many mid to high level 4 PCs will have dual core CPUs.
5.0
This level of machine represents the highest end of the PC market - gaming machines, high performance desktops, powerful media center systems and the like. Level 5 PCs will dramatically exceed the Windows Premium logo requirements. They will easily run Aero-Glass on multi-monitor systems at high resolution. First person shooters, multiple HD streams, video creation, high end multimedia applications are all characteristic scenarios of people who will be using Level 5 systems. As Level 6 machines are not defined yet, it is possible that the highest performance and capable Level 5 machines may be re-leveled as level 6 in the future (i.e. that may happen if the new hardware is evaluated before the index is updated with the new capabilities).
6.0 and beyond
Base scores of 6.0 and higher are not defined yet. They will be defined when the time comes and new innovations in hardware allow new capabilities. From past experience, it is expected this will happen at a rate of once every 12-18 months.
Accessing information programatically
So now that we have an understanding of what the numbers mean and how they are calculated, it’s possible that we could use this information to modify the behavior of our application.
First you need to know where to find the WinSAT API. It is located in the %windir%\system32 folder and is contained in the WinSATAPI.dll as a COM library. Documentation is available in the Windows SDK and online on MSDN. For now, we will limit our focus on the following interfaces:
IProvideWinSATResultsInfo- Retrieves information regarding the WinSAT assessment (the Windows Experience Index) such as the assessment state, assessment date and time, a friendly description and the base score. Using theGetAssessmentInfo, detailed information can be obtained, represented as anIProvideWinSATAssessmentInfointerface.IProvideWinSATAssessmentInfo- Retrieves information such as description, score and title about an individual component assessment (e.g. CPU, memory, graphics, gaming and disk).IProvideWinSATVisuals- Used to retrieve a Vista generated bitmap that represents a score graphically, as shown below. This is the same mechanism used in the Vista UI and you can leverage it to display the same information in your application in a consistent manner as will be done through software packaging, downloads, etc.
Launch Visual Studio 2005 and to create a Windows Application in VB, named WinSAT. Next we need to add a reference to the WinSAT COM library.
To add a reference, access the projects properties and select the “References” tab. Click the “Add” button which will display the “Add reference” dialog. At this point you can either use the “COM” or “Browse” tab to find the library to add. Using the “COM” tab, search through the list for the “Winsat 1.0 Type Library”, select it and press the “OK” button. Using the “Browse” tab, browse to the %windir%\system32\WinSATAPI.dll file accordingly.
Once you have the library added to your list of “References”, you can press the “X” button to close the project properties.
Open the code view for Form1.vb. Add the following two lines to the very top (outside of the Class):
1
2
3
4
5
Imports WINSATLib
Imports WINSATLib.WINSAT_ASSESSMENT_STATE
Imports WinSATLib.WINSAT_ASSESSMENT_TYPE
Imports WINSATLib.WINSAT_BITMAP_SIZE
Imports System.Runtime.InteropServices
The first four lines import the WinSAT library and enumerators to save us a bit of typing. The last line will be utilized when we interact with the library to pull the Vista generated graphic representing the base score.
At this point, you now have access to the WinSAT information in your Windows Application. Let’s just try something really simple. In the Form_Load event, add the following code:
1
2
3
4
Dim winSat As New CQueryWinSATClass()
MsgBox(winSat.Info.RatingStateDesc & vbCrLf & _
       winSat.Info.AssessmentDateTime.ToString & vbCrLf & _
       winSat.Info.SystemRating)
At this point, you can run the application and a message box will be displayed that looks like the following:
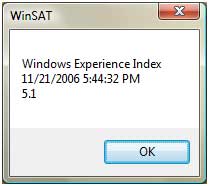
As you can see, it’s very simple to get the overall “base score” and when this score was determined. Now remember the base score (of which this method returns) represents the lowest score across all the components (with a variance allowance of .1) so if you wanted to adjust your software based on one of the individual component scores, we’d have to delve a little deeper. Let’s say that you wanted to adjust some drawing functionality based on the graphics score. Replace the code in the Form_Load event with the following:
1
2
3
4
5
6
Dim winSat As New CQueryWinSATClass()
Dim info As IProvideWinSATAssessmentInfo = _
  winSat.Info.GetAssessmentInfo(WINSAT_ASSESSMENT_GRAPHICS)
MsgBox(info.Title & vbCrLf & _
       info.Description & vbCrLf & _
       info.Score)
Execute the project and you should now see a message box similar to the following:
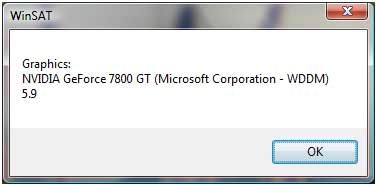
At this point, you can see that the score for my graphics card is a 5.9 and I have an NVIDIA GeForce 7800 GT utilizing the WDDM drivers from Microsoft Corporation. As you can see, it’s pretty simple to get the individual scores. Using the scores, you can modify your application to respond accordingly based on the end users machine characteristics.
Now let’s say that you’d like to display the Vista generated image that represents the base score to the end user in your applications “About” dialog. To do so, add a new item to your project (right click on the project and use the “Add->New item” context menu item). From the “Add new item” dialog, select the “About Box” item and press OK. You should now have an AboutBox1.vb file added to your project and Visual Studio 2005 has opened Windows Forms designer automatically upon adding the file. For simplicity sake, we’ll just be replacing the included graphic with the Vista generated base score image. Open the code view for AboutBox1.vb. Add the imports statements we added to Form1 to this file and in the Form_Load event, add the following code after all of the other code already included:
1
2
3
4
5
6
7
8
9
10
11
12
13
14
15
16
17
18
19
20
21
22
23
24
25
26
27
28
29
30
31
32
33
34
35
' Get bitmap with assessment rating figure in WinSAT style.
Dim winSat As New CQueryWinSATClass()

' To hold the "real" Hbitmap value (Integer).
Dim bitmapPointerBuffer(3) As Byte
' Pin the buffer for interop usage.
Dim handle As GCHandle = GCHandle.Alloc(bitmapPointerBuffer, GCHandleType.Pinned)
' Retrieve the pointer to the pinned location.
Dim bitmapPointerPointer As IntPtr = handle.AddrOfPinnedObject()
' Create an instance of the class that will provide the image.
Dim v As New CProvideWinSATVisualsClass()
' Call the method to retrieve the pointer to the graphic.
v.get_Bitmap(WINSAT_BITMAP_SIZE_NORMAL, _
             winSat.Info.AssessmentState, _
             winSat.Info.SystemRating, _
             bitmapPointerPointer)
' Release the buffer from being "pinned".
handle.Free()

' Check to make sure that we actually have a value in the buffer.
If BitConverter.ToInt32(bitmapPointerBuffer, 0) <> 0 Then

  ' Convert the buffers value to an IntPtr and use it to get an
  ' image from the Hbitmap (IntPtr).
  Dim bmp As Bitmap = Bitmap.FromHbitmap(_
    New IntPtr(BitConverter.ToInt32(bitmapPointerBuffer, 0)))

  ' Modify the default behavior of the AboutBox's LogoPictureBox
  ' from StretchImage to Normal.
  LogoPictureBox.SizeMode = PictureBoxSizeMode.Normal

  ' Set the LogoPictureBox image to the Vista generated base score image.
  LogoPictureBox.Image = bmp

End If
In order to get the about box to show, replace the code in Form1.vb for the Form_Load event with the following code:
1
AboutBox1.ShowDialog()
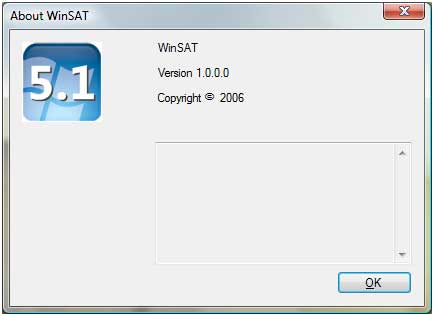
Execute the application and you’ll see that the about box now looks similar to the following:
Let’s delve into the work that was necessary to retrieve the generated image. Obviously this COM library was designed to be utilized by Windows Vista. As such, it was not necessarily designed to be used from your application or from .NET directly (and I am a little disappointed since the party line I’ve been hearing has been “all new API’s would be .NET friendly”).
As such, we have to do a little work to get this information. If we were using C++, it’s a simple matter of dealing with pointers. If we were using C#, we could utilize “unsafe” code to, again, deal with pointers. (Personally, I think the utilization of “unsafe” if there is an alternative is a bad idea, but that is a personal opinion so digest accordingly.) So how do we pull off the same functionality in this case without the use of “pointers”? Well, a pointer is simply an address to a memory location that contains the information we are looking for. .NET does contain such a construct to hold these and it’s called System.IntPtr. However, we can’t just simply pass an IntPtr to the method since it’s actually a pointer to a pointer. So, what we need to do is pass to the method a pointer to a block of memory that we can then use to pull the written pointer that ultimately points to the dynamically generated image.
This is where we take advantage of some of the Interop features with a little help from the garbage collector. We first create a four byte buffer to hold a signed integer value (the real pointer to the generated image). This buffer is then “pinned” using the garbage collector classes. By pinning the buffer, it will tell the garbage collector not to move it around during GC compaction. We can then get the address to this location using the AddrOfPinnedObject. This will act as our pointer to the pointer in the get_Bitmap call.
At this point we can now utilize the CProvideWinSATVisualsClass to get the generated image (get_Bitmap). We will pass in the address of the pinned object (bitmapPointerPointer in this case). Upon completion, the buffer that bitmapPointerPointer points to should contain an address pointing to the actual generated image. Now that the method has completed, we can “un-pin” the address so GC can do its normal job with the variable. This is done by using the .Free() method on the handle we created during the creation of the pinned object.
We can now utilize the BitConverter class to interrogate the buffer to see if it is a value that is greater or less than 0. (If it is 0, we didn’t get and address for some reason). Using this, we can then convert the contained four bytes to an IntPtr that can in turn be utilized by the Bitmap class to “convert” the bitmap to a BCL compatible one. This is done using the Bitmap.FromHbitmap method.
Now that you have a BCL compatible bitmap, you can do anything you could do normally as such. In this case we are just setting the Image property to the bitmap so it will be displayed on the form.
Up to this point, we’ve covered the basics of gathering the information and how to retrieve the Vista generated image. All of this was making the assumption that the WinSAT state was where it should be in order to gather the information. You should check the current state accordingly before calling any of the methods to verify that the numbers are indeed meaningful. This can be done simply by wrapping the code (after the initial declare statement for CQueryWinSATClass) with the following:
1
2
3
If winSat.Info.AssessmentState = WINSAT_ASSESSMENT_STATE_VALID OrElse _
  winSat.Info.AssessmentState = WINSAT_ASSESSMENT_STATE_INCOHERENT_WITH_HARDWARE Then
End If
The various states are contained within the WINSAT_ASSESSMENT_STATE enumeration and are defined as:
WINSAT_ASSESSMENT_STATE_MIN- Minimum enumeration value for this enumeration.WINSAT_ASSESSMENT_STATE_UNKNOWN- The current state of the assessment is unknown.WINSAT_ASSESSMENT_STATE_VALID- The current assessment data is valid for the current computer configuration.WINSAT_ASSESSMENT_STATE_INCOHERENT_WITH_HARDWARE- The hardware has changed configuration since the last time a formal assessment was run but the data is still present and should be displayed.WINSAT_ASSESSMENT_STATE_NOT_AVAILABLE- No data is available because a formal WinSAT assessment has not been run on this computer.WINSAT_ASSESSMENT_STATE_INVALID- The assessment data is not valid.WINSAT_ASSESSMENT_STATE_MAX- Minimum enumeration value for this enumeration.
In our case, we are only interested in the VALID and INCOHERENT_WITH_HARDWARE states. All others, we assume that something is wrong and handle accordingly.
Taking it a step further
Now that we’ve run through the basics of access the information, let’s do something a little more interesting. We are going to build a “clone” of the Windows Experience Index display that is in Windows Vista. All the steps to create will be done in an overview fashion, so please download the sample to follow along.
So going back to our project we’ve created up to this point, we are going to remove the code contained within the Form_Load event. We’ll come back to this in a few moments.
Opening the Form1.vb file in the Windows Forms designer, we are going to make the form a little bit larger (566 by 265). We are going to add the following components:
Labelthat contains the text"Your computer has a Windows Experience Index base score of". (Name:IndexLabel, Location: 9, 13)PictureBoxthat is sized to 30 x 24 pixels and has theSizeModeset toStretchImage. (Name:IndexPictureBox, Location: 315, 7)Panelwith its size set to 525 x 3 and theBackColorset toLightGray. (Name:BorderPanel1, Location: 525, 3)Labelthat contains the text"Component"and the font modified toBold. (Name:ComponentLabel, Location: 12, 53)Labelthat contains the text"What is rated". (Name:WhatIsRatedLabel, Location: 148, 53)Labelthat contains the text"Subscore". (Name:SubscoreLabel, Location: 362, 53)Labelthat contains the text"Base score". (Name:BaseScoreHeaderLabel, Location: 437, 53)Panelwith its size set to 525 x 2 and theBackColorset toLightGray. (Name:BorderPanel2, Location: 12, 74)- Add five
Panelcontrols with their size set to 408 x 23. (Name:ProcessorPanel, Location: 12, 76,MemoryPanel, Location: 12, 101,GraphicsPanel, Location: 12, 126,GamingPanel, Location: 12, 151 andHardDiskPanel, Location: 12, 176) - To each of the panels, add three
Labelcontrols. These will be organized into three columns across the five panels. The first column in each panel will have the label control modified to have the text bold. The third column will have theTextAlignmodified toMiddleCenter, the height set to 21, the width set to 26 and top set to 0. The tops of the first two columns are set to 4 and the column offsets are 3, 136 and 380 accordingly. The names for each one follow a similar pattern. For example, the first row containsProcessorNameLabel,ProcessorDescriptionLabelandProcessorLabel. The other rows are similar and follow suite based on the Panel name they are contained within. The text for the first two columns matches the Windows Experience Index dialog, leaving the third column blank. Panelwith its size set to 118 x 123 and theBackColorset toLavender. (Name:BaseScorePanel, Location: 420, 75)- To the
BaseScorePanel, add aPictureBoxcontrol sized to 80, 80. (Name:BaseScorePictureBox, Location: 18, 6) - To the
BaseScorePanel, add aLabel. Set theAutoSizemode to False and size the label to 86, 32. (Name:BaseScoreLabel, Location: 17, 89) Panelwith its size set to 525 x 2 and theBackColorset toLightGray. (Name:BorderPanel3, Location: 12, 196)Labelthat contains no text. Modify theAutoSizemode to false, theTextAligntoRightCenter,ForeColortoMenuHighlightand size to 409, 14. (Name:DateLabel, Location: 129, 204)
Now we are ready to add the code. In the Form_Load event, add the following code:
1
2
3
4
5
6
7
8
9
10
11
12
13
14
15
16
17
18
19
20
21
22
23
24
25
26
27
28
29
30
31
32
33
34
35
36
37
38
39
40
41
42
43
44
45
46
47
48
49
50
51
52
53
54
55
56
57
58
59
60
61
62
63
64
65
66
67
68
69
70
71
72
73
74
75
76
77
78
79
80
81
82
83
84
85
86
87
88
89
90
91
92
93
94
95
96
97
98
Try

  ' Provides access to assessment state.
  Dim winSat As New CQueryWinSATClass()

  ' Check for valid state.
  If winSat.Info.AssessmentState = WINSAT_ASSESSMENT_STATE_VALID OrElse _
     winSat.Info.AssessmentState = WINSAT_ASSESSMENT_STATE_INCOHERENT_WITH_HARDWARE Then

    ' General rating information.
      DateLabel.Text = String.Format("{0} on {1}", winSat.Info.RatingStateDesc, winSat.Info.AssessmentDateTime)

    ' Get ratings for individual assessment types.

    For Each type As WINSAT_ASSESSMENT_TYPE In _
      [Enum].GetValues(GetType(WINSAT_ASSESSMENT_TYPE))
      Dim info As IProvideWinSATAssessmentInfo = winSat.Info.GetAssessmentInfo(type)
      Select Case type
        Case WINSAT_ASSESSMENT_CPU
          ProcessorLabel.Text = info.Score.ToString
          If info.Score = winSat.Info.SystemRating Then
            ProcessorLabel.BackColor = Color.Lavender
          End If
        Case WINSAT_ASSESSMENT_MEMORY
          MemoryLabel.Text = info.Score.ToString
          If info.Score = winSat.Info.SystemRating Then
            MemoryLabel.BackColor = Color.Lavender
          End If
        Case WINSAT_ASSESSMENT_GRAPHICS
          GraphicsLabel.Text = info.Score.ToString
          If info.Score = winSat.Info.SystemRating Then
            GraphicsLabel.BackColor = Color.Lavender
          End If
        Case WINSAT_ASSESSMENT_D3D
          GamingLabel.Text = info.Score.ToString
          If info.Score = winSat.Info.SystemRating Then
            GamingLabel.BackColor = Color.Lavender
          End If
        Case WINSAT_ASSESSMENT_DISK
          HardDiskLabel.Text = info.Score.ToString
          If info.Score = winSat.Info.SystemRating Then
            HardDiskLabel.BackColor = Color.Lavender
          End If
        Case Else
          Throw New InvalidOperationException("Unknown WinSAT Assessment Type")
      End Select
    Next

    ' Overall system base score.
    Me.Text = "WinSAT - Base score: " & winSat.Info.SystemRating

    ' Get bitmap with assessment rating figure in WinSAT style.

    ' To hold the "real" Hbitmap value (Integer).
    Dim bitmapPointerBuffer(3) As Byte
    ' Pin the buffer for interop usage.
    Dim handle As GCHandle = GCHandle.Alloc(bitmapPointerBuffer, GCHandleType.Pinned)
    ' Retrieve the pointer to the pinned location.
    Dim bitmapPointerPointer As IntPtr = handle.AddrOfPinnedObject()
    ' Create an instance of the class that will provide the image.
    Dim v As New CProvideWinSATVisualsClass()
    v.get_Bitmap(WINSAT_BITMAP_SIZE_NORMAL, _
                 winSat.Info.AssessmentState, _
                 winSat.Info.SystemRating, _
                 bitmapPointerPointer)
    ' Release the buffer from being "pinned".
    handle.Free()

    ' Check to make sure that we actually have a value in the buffer.
    If BitConverter.ToInt32(bitmapPointerBuffer, 0) <> 0 Then

      ' Convert the buffers value to an IntPtr and use it to
      ' get an image from the Hbitmap (IntPtr).
      Dim bmp As Bitmap = Bitmap.FromHbitmap( _
        New IntPtr(BitConverter.ToInt32(bitmapPointerBuffer, 0)))

      ' Turn the white into transparent.
      bmp.MakeTransparent(Color.White)

      ' Small image on white background.
      IndexPictureBox.Image = bmp

      ' Larger image on Lavendar background.
      BaseScorePictureBox.Image = bmp

    End If

  Else

    DateLabel.Text = "Error: Unexpected state."

  End If

Catch ex As System.Runtime.InteropServices.COMException

  DateLabel.Text = "Error: " & ex.ToString

End Try
We can now execute the application to make sure everything is working as expected. I’ve commented the code, so I’m not going to go into too much detail as to what is going on except to say that we are utilizing the same techniques in order to display the information on the screen that we did at the beginning of the article. In addition, if / when the application is executed previous to Windows Vista machine, we handle the COM exception that will be generated (since the library doesn’t actually exist on pre-Vista machines).
You will notice though that the display doesn’t completely look like the Vista counterpart we are cloning. The Vista version has the component panels set as a gradient background. To handle this, modify all of the labels contained on the five panels so they are their background color is set to transparent. Now add the following code to the Form1 class to handle the Paint event for the panels.
1
2
3
4
5
6
7
8
9
10
11
12
13
14
15
16
17
18
19
20
21
22
Private Sub GradientPanel_Paint(ByVal sender As System.Object, _
                                ByVal e As System.Windows.Forms.PaintEventArgs) _
  Handles ProcessorPanel.Paint, _
          MemoryPanel.Paint, _
          GraphicsPanel.Paint, _
          GamingPanel.Paint, _
          HardDrivePanel.Paint

  If TypeOf sender Is Control Then

    Dim rect As New Rectangle(0, 0, DirectCast(sender, Control).Width, DirectCast(sender, Control).Height)

    Using b As New Drawing2D.LinearGradientBrush(rect, _
                                                 Color.Lavender, _
                                                 Color.White, _
                                                 Drawing2D.LinearGradientMode.Horizontal)
      e.Graphics.FillRectangle(b, rect)
    End Using

  End If

End Sub
The above code will simply determine the panel being handled and create a linear gradient brush to fill the rectangle with. Since we set the labels contained on the panel to transparent backgrounds, it will be automatically handled by the WinForms engine in .NET 2.0 to “copy” the containers background that it overlaps as the background for the label before drawing the text. Now when you execute the application, you should end up with something that looks similar to the following:
Summary
And there you go. You’re now been able to retrieve the performance characteristics of a Windows Vista machine to use however you see fit. Along the way you’ve explored how to do a little bit of Interop and custom drawing to spruce up your application.
As always, if you have any questions, please feel free to send them my direction.
You can download the code from here.
Further Reading
This article was initially inspired by one written by Bart De Smet, Windows Vista - Exploring The Windows System Assessment Tool (WINSAT) API In C#. So if you’re interested in a how do to this using C# (or simply a different perspective), please feel free to bounce over to his article for a look see.
You can also view the complete WinSAT SDK reference online by browsing to the MSDN website under the MSDN Library -> Win32 and COM Development -> Security -> Windows System Assessment -> WinSAT Reference.
To read more about how the numbers are actually calculated and what they ultimately mean, be sure to read Nick White’s “Windows Experience Index: An In-Depth Look”.
UPDATE: Modified the gradient drawing to be a little cleaner and defensive. (Thanks to Michael for pointing out the obvious and setting me straight.)
UPDATE: Something was bothering me after I posted the article but wasn’t sure it was really necessary. Since I had to make changes anyway, I modified the source code to handle releasing the COM references as described here.