Walkthrough: Developing Owner Drawn User Controls - Part 1 (TransPanel)
Introduction
After seeing Microsoft Windows Media Center Edition, I really liked the the look of using semi-transparent elements to differentiate areas of the screen. I set off to figure out how to accomplish this sort of behavior using .NET functionality. The good news, it can be done. The bad new, it’s not nearly as fast as the Media Center Edition counterparts since it’s using DirectX behind the scenes. However, with some creating thing and careful layout, you can achieve impressive results with the components that we will develop over the next three articles.
What will this article do for you?
Throughout these articles, we will be walking through how to build a Windows Form components from start to finish. These components will be housed in it’s own assembly so you can reuse it in several projects. You will learn how to add a property that will be visible in the properties window and how to add some attributes to control how the property is displayed. We will also delve into some advanced System.Drawing features to accomplish the display of the component. And finally, to make our life easier, we will be taking advantage of Inheritance to extend the controls that already exist.
Initial Setup of our Project Environment
- Create a blank solution.
- Add a new Windows Form project to the solution called
Demo(under it’s own subdirectory). - Add a new Control Library project called
TransControls(under it’s own subdirectory). - Delete the
UserControl1.vbfile from theTransControlsproject. - (Optional) Click add reference (in the solution explorer for the
Demoapplication). - Select the
Projectstab. TransControlswill be listed. Double click it to add it to the selected components list.- Select OK.
Creating the TransPanel Component
- Add a new
Componentto theTransControlsproject, call itTransPanel. - View the source for the
TransPanelclass. - Add the following to the top of the code.
1
2
Option Explicit On
Option Strict On
Note: I add both because there are some instances where you may want to turn off strict type checking, but still have explicit variable declarations.
- Change the
Inheritsline to read:
1
Inherits System.Windows.Forms.Panel
This will allow us to extend and modify the base panel control since all we are wanting to do is change the behavior of how the panel is drawn.
- Now let’s add a few
Importsstatements to make our life easier.
1
2
3
Imports System.ComponentModel
Imports System.Drawing.Imaging
Imports System.Drawing.Drawing2D
Since we are wanting to make semi-transparent components, we need to allow the ability to specify how transparent the control is. To do this, will take a cue from the Forms class and add an Opacity property to our extended panel control.
- First, add a private member variable to store the opacity value.
1
Private _opacity As Double = 0.1
- Next, create a public property for
Opacity.
1
2
3
4
5
6
7
8
Public Property Opacity() As Double
  Get
    Return _opacity
  End Get
  Set(ByVal Value As Double)
    _opacity = Value
  End Set
End Property
- Since we are only wanting to have a value between 0 and 1, let’s add some validation to the
Setportion of the property.
1
2
3
4
5
6
Set(ByVal Value As Double)
  If Value < 0 OrElse Value > 1 Then
    Throw New ArgumentException("Value must be between 0.00 and 1.00")
  End If
  _opacity = Value
End Set
- Now, we want to control how this property is displayed in the properties view when we are working with a form.
1
<Category("Appearance"), DefaultValue(GetType(Double), "0.1"), Description("Gets or Sets the opacity level of the panel.") >
This will mark the Opacity property with a couple of attributes telling it that it will appear in the Appearance portion of the properties view, the default is 0.1 (10%) and the description that is displayed to the developer as to what this property is used for.
- Next, we are going to want to actually control how this component is drawn. So the first logical choice is to override the
OnPaintevent. You can use the drop down at the top of the code window to select theOnPaintevent by selecting Overrides in the left drop down and on the right drop down browse for theOnPaintevent and select it. This will add the following to your code:
1
2
Protected Overrides Sub OnPaint(ByVal e As System.Windows.Forms.PaintEventArgs)
End Sub
OK, here’s our plan of attack for creating a semi-transparent panel. First, we are going to make the panel completely transparent. Once we complete this, we will then overlay the transparent area with a semi-transparent rectangle the size of the panel using the opacity level.
So for the first step, we need to check to see if the container control has a background image specified.
- Add the following to the
OnPaintmethod.
1
2
3
4
5
6
7
8
If Not (Parent.BackgroundImage Is Nothing) Then
  e.Graphics.DrawImage(Parent.BackgroundImage, _
    New Rectangle(0, 0, Me.Width, Me.Height), _
    Me.Left, Me.Top, Me.Width, Me.Height, GraphicsUnit.Pixel)
Else
  e.Graphics.FillRectangle(New SolidBrush(Parent.BackColor), _
  New Rectangle(0, 0, Me.Width, Me.Height))
End If
- Build the
TransControlsproject. - Open the Demo projects
Form1in the forms designer view. - Select
My User Controlsin theToolbox. - Right mouse in that area and select
Add/Remove Items. - Select the browse button.
- Browse to the
TransControlsproject folder, then to the bin folder. - Double click the
TransControls.dllfile. - Select OK. You should now see the
TransPanelcomponent in theMy User Controlslist. - Double click the component in the
Toolboxto add an instance to the form.
As you can see, nothing really spectacular at this point, since it’s being drawn using the background color of the parent control. To test this, change the back color of TransLabel1. Hmm… still the same color as the forms background color. Good… Now let’s add a background image to the main form.
Now play with the component with the selected background. Resize it, move it around. Notice a problem? It’s not updating based on some of the changes being made. Let’s fix this. Resizing looks OK, since a repaint if forced whenever a resize occurs. Moving on the other hand, we need to handle this one.
- Go back to the code view of the
TransPanelcomponent. - Select
Overridesfrom the leftmost drop down above the code view and on the the right drop down selectOnMove. You should now have the following added to your code:
1
2
Protected Overrides Sub OnMove(ByVal e As System.EventArgs)
End Sub
- We want to force a repaint. It’s very easy to do so. Add the following line to the
OnMovemethod.
1
Me.Invalidate()
Now, any time we move the component, it will force a redraw.
- Build the
TransControlsproject. - Go back over to the
Demoproject, select theForm1.vbfile in the forms designer. Now when you move theTransPanelcontrol, it will update accordingly.
OK, let’s see if there’s anything else we can do to see if we cause any other types of weirdness. Hmm… resizing the component flickers quite a bit and it flashes to the background color I specified before repainting using the background. How can we fix this?
What we need to do is take advantage of a double buffering technique. Where all of the drawing is done in memory before being displayed to the screen. We will modify some of the style elements for the component.
- Expand the “Component Designer generated code” region.
- Find the comment that states the following:
1
'Add any initialization after the InitializeComponent() call
- After this you will add the following:
1
2
3
Me.SetStyle(ControlStyles.DoubleBuffer, True)
Me.SetStyle(ControlStyles.AllPaintingInWmPaint, True)
Me.SetStyle(ControlStyles.UserPaint, True)
Note: In order to use ControlStyles.DoubleBuffer efficiently, one should also set ControlStyles.AllPaintingInWmPaint and ControlStyles.UserPaint to true, this will redirect all sort of drawing events to your OnPaint event handler. Specially it will bypass the WM_ERASEBKGND messages. So in your Form’s OnLoad event handler.
- Build the
TransPanelproject and test the the component inForm1. Resizing no longer causes flickering.
Now, since we are basing our control off of the base Panel control, we also need to support a background image if one is selected.
- Back to the
OnPaintmethod. Modify it to look as follows:
1
2
3
4
5
6
7
8
9
10
If Me.BackgroundImage Is Nothing Then
  If Not (Parent.BackgroundImage Is Nothing) Then
    e.Graphics.DrawImage(Parent.BackgroundImage, _
      New Rectangle(0, 0, Me.Width, Me.Height), _
      Me.Left, Me.Top, Me.Width, Me.Height, GraphicsUnit.Pixel)
  Else
    e.Graphics.FillRectangle(New SolidBrush(Parent.BackColor), _
    New Rectangle(0, 0, Me.Width, Me.Height))
  End If
End If
This will now tell the base panel component to do it’s default drawing if a background image is specified. Otherwise, our new behavior will be done.
- Build the
TransControlsproject and let’s do some more testing. - Once you build the project, jump back over
Form1. - Specify a background image for
TransPanel1. You will see thatTransPanelwill indeed act as expected.
Note: To remove the background image, select the text value in the properties view for background image and press delete. It’s back to your transparent control.
Now, for some of the fun stuff. We are going to enable our semi-transparent rectangle over the new background of our component.
In order to achieve the semi-transparent look we are after, we are going to have to modify how the colored rectangle is drawn over the control. To do this we will define a color matrix and attributes that will be applied to the image that will be drawn. I’m not going to go into extreme detail of how this code works, you can look up the namespace methods for more detail. However, I will point out how the translucency is accomplished, since this is important to our specific task.
- Jump back over to the
TransPanelsource. - Add the following code after the code we’ve built already in the
OnPaintmethod:
1
2
3
4
5
6
7
8
9
10
11
12
Dim attributes As New ImageAttributes

Dim matrixElements As Single()() = { _
  New Single() {1.0F, 0.0F, 0.0F, 0.0F, 0.0F}, _
  New Single() {0.0F, 1.0F, 0.0F, 0.0F, 0.0F}, _
  New Single() {0.0F, 0.0F, 1.0F, 0.0F, 0.0F}, _
  New Single() {0.0F, 0.0F, 0.0F, CSng(_opacity), 0.0F}, _
  New Single() {0.0F, 0.0F, 0.0F, 0.0F, 1.0F}}

Dim matrix As ColorMatrix
matrix = New ColorMatrix(matrixElements)
attributes.SetColorMatrix(matrix, ColorMatrixFlag.Default, ColorAdjustType.Bitmap)
The part that you are going to be interested in is the 5th line of the matrixElements definition. The CSng(_opacity) is how we are actually controlling the translucency value.
Now let’s put these attributes into use. We will create a bitmap in memory that is simply the same size as our components current region and use FillRectangle to draw a solid colored rectangle using our controls backcolor. Once this is completed, we will use DrawImage to paste this image over our controls background applying the attributes we previously defined.
- Add the following code to the
OnPaintmethod:
1
2
3
4
5
6
7
8
Dim bitmap As Bitmap = New Bitmap(Me.Width, Me.Height, PixelFormat.Format24bppRgb)
Dim g As Graphics = Graphics.FromImage(bitmap)
Dim brush As Brush = New SolidBrush(Me.BackColor)
g.FillRectangle(brush, New RectangleF(0, 0, Me.Width, Me.Height))
brush.Dispose()
e.Graphics.DrawImage(bitmap, _
  New Rectangle(0, 0, Me.Width, Me.Height), _
  0, 0, Me.Width, Me.Height, GraphicsUnit.Pixel, attributes)
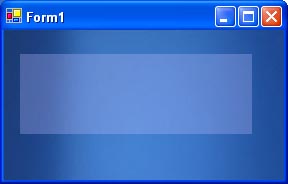
- Build the project and let’s see how it looks on
Form1.
OK, great, the image changed just slightly. It’s got a hint of the background color that is currently selected for TransPanel. However, now your saying to yourself, if I change the opacity value, it doesn’t update. What’s wrong here?
Simple, we just need to let our component know that whenever the opacity value changes, we need to redraw using the new value.
- Add the following code to the
Opacityproperty set region.
1
Me.Invalidate()
- Build the
TransControlsproject and test again.
Conclusion
This concludes the first part of the three part TransControls components article. The next article, we will add a TransLabel control that works in a very similar fashion. Following the TransLabel component, we will finish with a Button component to wrap things up. However, there’s a gotcha. Any takers as to what the issue might be. Send in your comments now and the answer will be revealed in the next article.
Download(s)
TransControls Sample with Source (Part 1)
Additional Resources
Duncan MacKenzie has put together a collection of articles that shows many of the same concepts that I will be touching upon over the next several articles. It’s a 5 part series and here are the links directly to them.
- MSDN - Developing Custom Windows Controls Using Visual Basic .NET
- MSDN - Adding Regular Expression Validation
- MSDN - Combining Multiple Controls Into One
- MSDN - Extending the TreeView Control
- MSDN - Drawing Your Own Controls Using GDI+
Note: It’s interesting to see how you will come across other peoples articles after you start writing your own ;-) Hopefully, the articles I’m putting together will be useful and provide different view on the subjects. As always, I will try to point you to other people who are writing about the same subject, so if you know of any other articles that pertain to this subject, please don’t hesitate to let me know so we can share this information with everyone else.
Also, all of the code will be provided at the end of the article series. This is to promote readers to follow along with this process (as I’m writing all of the code along with you) ;-) If your so inclined, you are welcome to send me any additional code snippets you create or suggestions you come up with pertaining to these projects.