Creating a Reusable Exception Dialog for .NET Applications
- Published: March 2002
- Author: Jason Bock
Introduction
.NET has made a lot of development issues much easier to solve than ever before for Windows developers. Specifically, GUI programming is much easier and flexible than what was available pre-.NET. In this article, I’ll demonstrate how you can create reusable windows that can be used in multiple Windows applications.
Reporting Exceptions
Lately I’ve been doing some GUI development on the side. I’ve been concentrating a lot on security aspects and low-level CIL programming and I wanted to get out of those worlds for a breather. So I started writing a couple of GUI applications to get familiar with the WinForms programming model. After writing some C# GUI code, I noticed that I was doing the standard MessageBox technique to report exception information:
1
2
3
4
5
6
7
8
9
10
11
public void SomeMethod()
{
    try
    {
        //  Imperfect code goes here...
    }
    catch(Exception e)
    {
        MessageBox.Show(e.Message());
    }
}
While this is a quick-and-dirty solution, the Exception class contains a lot more information that just a message. For example, you can recursively find inner exceptions via the InnerException property. You can also find out what the method stack trace was at the time the exception was created via the StackTrace property. Rather than have code that displays this information in a number of applications, I decided to create an assembly that contains a type dedicated to displaying exception information. Let’s cover what this window does.
Window Design
The ErrorForm type is located in the ErrorDialog assembly. This type was created by right-clicking on the ErrorDialog project node in the Solution Explorer window, and selecting Add, Add Windows Form…. VS.NET ends up putting a new form in your project, which equates to a new type that inherits from System.Windows.Forms.Form. That’s what I love about .NET: everything is a type, and ErrorForm is no different. As you’ll see later on, this makes using ErrorForm very easy to use.
Now, if you love to inflict punishment on yourself, you could hand-code the UI programming yourself. But the Forms Designer that you can use in VS.NET makes this as easy as it was to create Windows applications in VB. Therefore, I used the designer to lay out the UI components onto the form, and then I wired up the events as needed. Let’s go through each specific aspect of what this type does.
Form Construction
As this form will be used to display error information, I created a custom constructor that ErrorForm will use to show pertinent error information:
1
2
3
4
5
public ErrorForm(Exception TargetException)
{
    InitializeComponent();
    m_TargetEx = TargetException;
}
InitializeComponent() is a generated method that VS.NET creates to set up UI component properties when the type is created. Therefore, I call this method before I set my private instance field m_TargetEx to the exception in question.
General Exception Information
I used the TabControl class to display different exception information. The first tab (which is the default tab when the form is displayed) contains general exception information as Figure 1 shows:
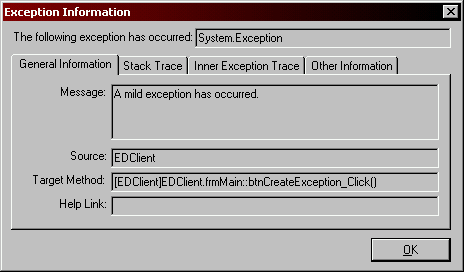
Figure 1 - General Information Tab
Rather than use Label controls to show the information, I used read-only TextBox controls. Therefore, if the user wanted to copy and paste this information they can do so by highlighting the text and copying the information. When the form is displayed, I know the first tab will be selected, so I call DisplayGeneralInformation() in the form’s Load() event:
1
2
3
4
5
6
7
8
9
10
11
12
13
14
15
private void DisplayGeneralInformation()
{
    if(false == this.m_hasGeneralBeenCalled)
    {
        this.txtExceptionMessageValue.Text =
            this.m_TargetEx.Message;
        this.txtExceptionSourceValue.Text =
            this.m_TargetEx.Source;
        this.txtExceptionTargetMethodValue.Text =
            GetTargetMethodFormat(this.m_TargetEx);
        this.txtHelpLinkValue.Text =
            this.m_TargetEx.HelpLink;
        this.m_hasGeneralBeenCalled = true;
    }
}
Note that in Load(), I also lock the form from doing anything if the client calls the default Form constructor:
1
2
3
4
5
6
7
8
9
10
11
12
13
14
15
private void frmError_Load(object sender,
    System.EventArgs e)
{
    if(null != this.m_TargetEx)
    {
        this.txtExceptionTypeValue.Text =
            this.m_TargetEx.GetType().FullName;
        DisplayGeneralInformation();
    }
    else
    {
        this.tabInfo.Enabled = false;
        this.txtExceptionTypeValue.Text = "Unknown";
    }
}
Since the tab control is where all of the data is viewed, by disabling it I effectively prevent any code from being run on the form.
There are four private boolean fields that I use to determine if the tab has been selected before. I only show the information on a “want-to-know” basis, and since the information is static, once it’s rendered I don’t need to run the display-code again. This code is also handled in the SelectedIndexChange() event, which calls DisplayTabInfo():
1
2
3
4
5
6
7
8
9
10
11
12
13
14
15
16
17
18
19
20
21
22
23
24
25
26
27
28
29
30
private void tabInfo_SelectedIndexChanged(object sender,
    System.EventArgs e)
{
    DisplayTabInfo();
}

private void DisplayTabInfo()
{
    switch(this.tabInfo.SelectedIndex)
    {
        case 0:
            // General info
            DisplayGeneralInformation();
            break;
        case 1:
            //  Stack trace info.
            DisplayStackTrace();
            break;
        case 2:
            //  Inner exception info.
            DisplayInnerExceptionTrace();
            break;
        case 3:
            //  Other information.
            DisplayOtherInformation();
            break;
        default:
            break;
    }
}
GetTargetMethodFormat() is a method that I use in a couple of places to display more information about the method that generated the exception than simply calling Name on the TargetSite property:
1
2
3
4
5
6
7
private string GetTargetMethodFormat(Exception Ex)
{
    return "[" +
        Ex.TargetSite.DeclaringType.Assembly.GetName().Name +
        "]" + Ex.TargetSite.DeclaringType +
        "::" + Ex.TargetSite.Name + "()";
}
Stack Trace
The second tab displays the method stack trace in a ListView with the View property set to Details - Figure 2 shows what this view looks like:
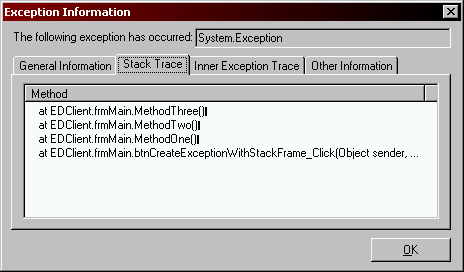
Figure 2 - Stack Trace Tab
DisplayStackTrace() handles the stack trace parsing - I use a fairly simplistic approach:
1
2
3
4
5
6
7
8
9
10
11
12
13
14
private void DisplayStackTrace()
{
    if(false == this.m_hasStackTraceBeenCalled)
    {
        string[] stackTrace = t
            this.m_TargetEx.StackTrace.Split(new char[] {'\n'});

        foreach(string st in stackTrace)
        {
            this.lstStackTrace.Items.Add(new ListViewItem(st));
        }
        this.m_hasStackTraceBeenCalled = true;
    }
}
I use Split() to get each method in the stack trace. Then it’s just a matter of pulling out each string in the generated list, and adding them to the list view control via Add().
Inner Exceptions
All inner exception information is displayed on the Inner Exception Trace tab shown in Figure 3:
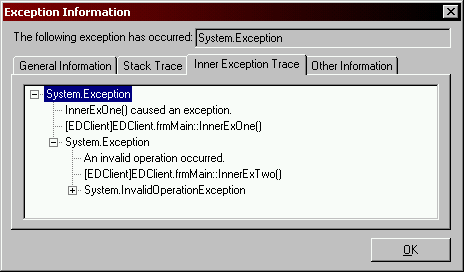
Figure 3 - Inner Exceptions Tab
In this tab, I use a TreeView type to show the inner exceptions and how they relate to each other. This is done in DisplayInnerExceptionTrace():
1
2
3
4
5
6
7
8
9
10
11
12
13
14
15
16
17
18
19
20
21
22
23
24
25
26
27
28
29
30
31
32
33
34
35
36
37
38
39
40
41
private void DisplayInnerExceptionTrace()
{
    if(false == this.m_hasInnerExceptionBeenCalled)
    {
        Exception innerEx = this.m_TargetEx;
        TreeNode parentNode = null,
            childNode = null, childMessage = null,
            childTarget = null;

        this.trvInnerExceptions.BeginUpdate();

        while(null != innerEx)
        {
            childNode = new TreeNode(
                innerEx.GetType().FullName);
            childMessage = new TreeNode(
                innerEx.Message);
            childTarget = new TreeNode(
                GetTargetMethodFormat(innerEx));

            childNode.Nodes.Add(childMessage);
            childNode.Nodes.Add(childTarget);

            if(null != parentNode)
            {
                parentNode.Nodes.Add(childNode);
            }
            else
            {
                this.trvInnerExceptions.Nodes.Add(
                    childNode);
            }

            parentNode = childNode;
            innerEx = innerEx.InnerException;
        }

        this.trvInnerExceptions.EndUpdate();
        this.m_hasInnerExceptionBeenCalled = true;
    }
}
What I really like about .NET GUI controls is the BeginUpdate() and EndUpdate() methods that some of the list-based controls have. These turn the rendering code off and on, respectively, so if you’re adding a lot of information to the control you can prevent a lot of unnecessary rendering code from being run. In this case, it’s probably not a big deal if I didn’t do this, but I think it’s a good practice to get into.
Custom Exception Information
The last tab doesn’t contain a lot of code, but I think it really shows how .NET makes development tasks so easy. The Exception type defines six properties, but it’s possible that a custom exception can add new properties that are available for inspection. Therefore, in DisplayOtherInformation() I show the values of these custom properties if they exist. Figure 4 shows what this tab looks like when custom information is encountered:
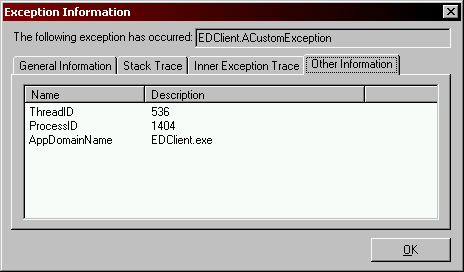
Figure 4 - Custom Information Tab
Here’s what the rendering code looks like:
1
2
3
4
5
6
7
8
9
10
11
12
13
14
15
16
17
18
19
20
21
22
23
24
25
26
27
private void DisplayOtherInformation()
{
    if(false == this.m_hasOtherInformationBeenCalled)
    {
        Hashtable ht =
            this.GetCustomExceptionInfo(this.m_TargetEx);
        IDictionaryEnumerator ide = ht.GetEnumerator();

        this.lstOtherInfo.Items.Clear();
        this.lstOtherInfo.BeginUpdate();

        ListViewItem lvi;

        while(ide.MoveNext())
        {
            lvi = new ListViewItem(ide.Key.ToString());
            if(null != ide.Value)
            {
                lvi.SubItems.Add(ide.Value.ToString());
            }
            this.lstOtherInfo.Items.Add(lvi);
        }

        this.lstOtherInfo.EndUpdate();
        this.m_hasOtherInformationBeenCalled = true;
    }
}
Nothing here is that exciting; the interesting code happens in GetCustomExceptionInfo():
1
2
3
4
5
6
7
8
9
10
11
12
13
14
15
16
17
18
private Hashtable GetCustomExceptionInfo(Exception Ex)
{
    Hashtable customInfo = new Hashtable();

    foreach(PropertyInfo pi in
        Ex.GetType().GetProperties())
    {
        Type baseEx = typeof(System.Exception);

        if(null == baseEx.GetProperty(pi.Name))
        {
            customInfo.Add(pi.Name,
                pi.GetValue(Ex, null));
        }
    }

    return customInfo;
}
The fact that .NET has the ability to do introspection via the System.Reflection types makes the implementation of this method very simple. I iterate through each property of the given exception. If this property doesn’t exist in the base exception (System.Exception), then I add its name and its value in string form to the Hashtable. Reflection is a powerful tool to have, especially in cases like this.
Using ErrorForm
If a developer wants to use this form, it’s very easy to do. All she needs to do is reference the assembly, and add a couple lines of code:
1
2
3
4
5
6
7
8
9
10
11
12
13
14
15
16
17
18
19
private void btnCreateException_Click(object sender,
    System.EventArgs e)
{
    try
    {
        throw new Exception(
            "A mild exception has occurred.");
    }
    catch(Exception ex)
    {
        DisplayException(ex);
    }
}

private void DisplayException(Exception TargetException)
{
    ErrorForm ef = new ErrorForm(TargetException);
    ef.ShowDialog(this);
}
Of course, because ErrorForm descends from Form, the client can change any of the type’s properties that it desires. For example, I can make the form opaque:
1
2
3
4
5
6
7
8
9
10
11
12
13
14
15
16
17
private void btnOpaqueExceptionDialog_Click(object sender,
    System.EventArgs e)
{
    try
    {
        throw new Exception(
            "I don't like opaque dialogs!");
    }
    catch(Exception ex)
    {
        ErrorForm ef = new ErrorForm(ex);
        ef.Text = "Too bad - it's opaque!";
        ef.Opacity = .78;
        ef.AllowTransparency = true;
        ef.ShowDialog(this);
    }
}
Figure 5 shows what the results are of running this code:
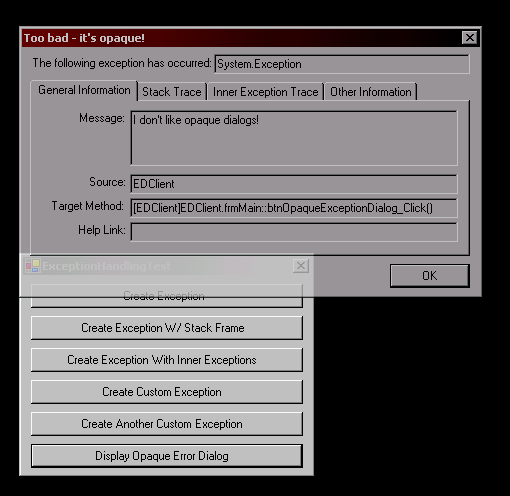
Figure 5 - Opaque Error Dialog
Conclusion
In this example, I demonstrated that it’s easy to create custom windows that can be reused in other applications. I created a window that displays exception information, and I showed what the results are when the client gives it different Exception types. I hope that you start to design your .NET GUI applications to distribute the windows between different assemblies. This gives you freedom to change different parts of your application without redistributing the entire application.
References and Code
All of the source code can be downloaded here.
Attribution
The above article is a reproduction; rescued thanks to Archive.org of the original published at Creating a Reusable Exception Dialog for .NET Applications and Creating a Reusable Exception Dialog for .NET Applications.